Beosound 9000 – IR receiver repair May 29, 2016
Posted by Florian in Audio, Devices, Repair, World.17 comments
I really like the design of most classic Bang & Olufsen stuff – but my favorite one is the Beosound 9000. Since I pretty much like to understand how all these technical devices we are surrounded with work, I usually take apart more or less everything in order to find out how it works and how to fix it… I decided to buy one to fix instead of getting a working one I might break. I did some “training” with other classic CD players before I bought an old and not working Beosound 9000 in order to see if I can fix it. I really admire the design, bit it did not take long till I started to admire the engineers even more… it must have been quite a tough job not only to make it work at all bit to make it possible to produce it in quantities.
First of all: There is a service manual for it which helps a lot with common issues and how to disassemble the device without breaking anything. B&O generally does a good job releasing service manuals for its devices. One important information from the manual is that without speakers or headphones connected the 9000 enters ‘mode 0’ which means that it does not take any input from the remote control. So I connected speakers and tried to enter service mode and change audio mode without success… from some forum posts I learned that the IR receiver PCB14 fails in some cases. Since I did not what to find a replacement I tried to fix it… and I had a lot of fun:
First I found out that PCB14 really does not supply any data to the controller board – it is connected with just three pins (ground, +5V and data) and there was no traffic on the data line at all. Unluckily the service manual does not contain a schematic of PCB14. So I started to find out how it is supposed to work… the receiver is built around a Vishay U2506B IR receiver – so I thought it would be easy to find out more using the data sheet of that one but even Vishay and its distributors do not seem to have one. In the end I used a broken Beolink 5000 two-way infrared remote control to find out about the signals on the PCB. It uses a similar design and the same controller.
It turned out that it was only a single broken 22µF capacitor – it is marked in the image below.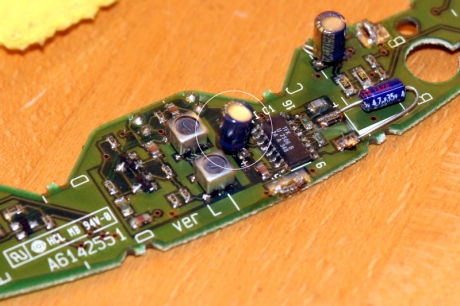
This shows the PCB with the replacement capacitor. It is a good idea to use a mechanically smaller replacement than I did because a long capacitor case has some potential to hit the CD drive sledge when entering position 6.
After replacing the capacitor the IR receiver started work again. It was necessary to change to mode 1 manually before I was able to enter service mode. The easiest way is to use a Beolink 1000 since it has a ‘Sound’ button for this purpose. Just press <Sound> <1> <Store>.
I have some more information about repairing this magnificent Beosound 9000… but that’s something for the next post.
Note to my readers: Please remind me to blog a little bit more frequently :-)
Computer startup aid using a LEGO train January 6, 2012
Posted by Florian in Devices, kernel concepts.4 comments
Some times it happens that I have to dig out some old piece of hardware and try to get it running again… I recently got a very geek present for my birthday – one that requires a working SGI Indigo next to it. Luckily nothing gets lost at kernel concepts and I was able to select from several Indigo gathering dust at the attic of our office. It looks like the machines survived quite some years not being used pretty well – including most of the harddisks. Unluckily all batteries which are supposed to supply the real-time clock chip were flat and these batteries are hard to get and soldered to the board. I did not have a replacement for the 3.6V Lithium battery but it was pretty easy to replace the battery with some cables to supply the board with 3.6V. The first thing to supply 3.6V I found was the electric LEGO locomotive the kids left lying around…

Indigo Lego Train
This one was powered by three 1.2V AA rechargeable batteries – perfect for some startup aid for this old machine. After applying power I was able to boot into IRIX 6.2 installed on this historic piece of hardware (100MHz MIPS R4000 CPU, 192MB of RAM, 2GB SCSI hard disk, ELAN graphics). I have to admit I somehow enjoyed the “time travel” experience playing around with such an old system for a while. Someone here still remembers the Netscape browser? Or Electropaint? One really scary experience was the network setup: IRIX 6.2 has the ability to configure a static IP through the GUI but obviously you have to edit the network startup script in order to set a default route on boot.
A lot more of information about these machines can be found here.
Mini6410 – Getting started with Free Software September 22, 2010
Posted by Florian in Devices, GPE, Linux, OpenEmbedded.10 comments
FriendlyARM is shipping the new Mini6410 for a little while now. It is based on a 533MHz clocked Samsung S3C6410. I do not want to repeat all the technical details here, an English description can be found here. Lets summarize the features in a simple sentence: It is fast enough for Qt and offers lots of ports for connectivity.

Mini6410 running an OpenEmbedded built GPE Image
The image pretty much illustrates what we are up to do now – but lets take a look at the software shipped with the board first. Compared to the older Mini2440 the devices official support DVD offers several more options: We have pre-compiled images based on Android, XUbuntu and Qtopia and an advanced U-Boot which comes with a kind of menu for the basic tasks. One major problem is that currently the documentation is available in Chinese only which makes it a little bit hard to handle. But translating single paragraphs of the more than 300 pages long PDF manual using Google Translator worked pretty well. The DVD contains important sources for Android, U-Boot and Linux. The Kernel is based on 2.6.28 for the SMDK 6410 reference design and heavily patched. Some parts are quite far from mainline Linux and should be updated to latest standards – apart from the fact the whole Linux support might want some rebase on 2.6.35.
Now we have a big pile eh… DVD with stuff that runs on the board already – what does OpenEmbedded help us with here? Well all the binary stuff serves some purpose but nothing is perfect – OE helps us with to become more flexible and consistent at the same time. XUbuntu is great with its large package repository to try out things – but it has quite some requirements about flash storage, RAM and screen size. With OE you have the choice to create a full featured desktop image or to build something that fits your particular need.
So lets take a brief look into OE setup for the Mini6410 and how to install an image built with OE.
If you are new to this topic you should get familiar with OpenEmbedded first. The official getting started document is a good thing to read first. The following section assumes you have your OE set up and cares about the Mini6410 specific bits only. Make sure to use a recent org.openembedded.dev or testing branch.
First set up your local.conf to build for the Mini6410 – if you are using multiple configuration files then make sure to distribute these bits over the files correctly:
MACHINE = "mini6410"
DISTRO = "angstrom-2008.1"
LIBC = "eglibc"
GLIBC_GENERATE_LOCALES = "en_GB.UTF-8 de_DE.UTF-8 fr_FR.UTF-8 en_US.UTF-8"
This will select the Mini6410 as a target device, Ångström distribution and eglibc – this is the combination I tested. The last line defines a limited set of libc locales to be generated.
Now let’s build a filesystem image. I built a simple GPE based filesystem image first:
bitbake x11-gpe-image
If everything is configured correctly, your harddisk is large enough and your Internet connection ok you should get filesystem and kernel image in $TMPDIR/deploy/eglibc/images/mini6410. For the impatient of you or the ones who get bored during a build (no I don not suffer from this) I have uploaded my results here.
Finally lets go ahead an install these files into the internal NAND flash. I’m using U-Boot on the boards – we want to stay open and do not rely on propitiatory software. Keep this in mind if you intend to make a product: Any component you are not able to influence has potential to cause trouble and in most cases it will do this – sooner or later.
There are several ways to install files and to configure U-Boot. Here we use a quite generic solution using TFTP to transfer the images and fixed addresses. Not the best solution but the simplest. First if you do not have a DHCP server you have to configure networking:
setenv ipaddr <some IP for the board>
setenv serverip <your server's IP>
If you have a DHCP server you can skip this step and write “dhcp” instead of “tftp” in the commands below. These will download the files and install them into the internal NAND flash:
tftp 0xc0008000 uImage-mini6410.ubi
nand erase 0x80000 0x500000
nand write 0xc0008000 0x80000 0x500000

tftp 0xc0008000 x11-gpe-image-mini6410.ubi
nand erase 0x580000
nand write 0xc0008000 0x580000 ${filesize}
Finally we configure the boot parameters to match the installed kernel + filesystem and save these:
setenv bootargs console=ttySAC0,115200 ubi.mtd=2
   root=ubi0:rootfs-mini6410 rootfstype=ubifs
saveenv
(note that the first command needs to be entered in a single line)
We do not have to pass information about the MTD partition layout to the kernel since we follow the kernel’s built-in default in this configuration. Just reset your board and check if it boots into your shiny new filesystem. If something is wrong then please drop me a mail providing information (e.g. bootlog, screenshot, configuration files…). This could help to improve this little text and OpenEmbedded support for the Mini6410.
What now?
Try more useful targets with OpenEmbedded. If you like to build an installable cross toolchain matching your filesystem you could build the meta-toolchain-gpe target for example.
Enjoy!
Sim.One Images with OpenEmbedded September 3, 2010
Posted by Florian in Devices, Linux, OpenEmbedded.4 comments
It took me a while to get started with the blog again… so let’s start with something tiny: OpenEmbedded images for the Sim.One. So far we had quite some documentation about filesystems on external media but what about the internal flash? We have 8MB which is enough for a tiny filesystem we can build with OpenEmbedded.
")
Sim.One (OpenEmbedded booth at LinuxTag)
OE has support for the Sim.One already and I just added the parameters to build jffs2 filesystems for the internal NOR flash. In order to build jffs2 images for the Sim.One use the current org.openembedded.dev branch.
OpenEmbedded Setup
I just want to introduce the basic ideas and useful settings for these images. More generic information about how to get started with OE can be found here. For my tests I used the minimal distribution definintion in OE and built a very small image. The relevant settings for your build configuration (local.conf) are as follows:
MACHINE = "simone"
DISTRO = "minimal"
LIBC = "eglibc"
IMAGE_FSTYPES = "tar.gz jffs2"
The minimal-image is a good starting point for the internal flash. The image does not include much of functionality but leaves some free space for additional software. OE does not build the filesystem only, it builds the kernel for us as well so that we can start with a consistent set of files. Let’s give it a try and install the built results – I assume you have a U-Boot shell and network+tftp server configured already.
Install Kernel
erase 0x60080000 0x6027ffff
tftp  0x60080000 uImage-simone.bin
Install Filesystem
erase 0x602c0000 0x60800000
tftp 0x602c0000 simone.jffs2
We need to tell the kernel where to find the patitions. The actual layout we are going to use is as follows:
Device    size        name
mtd0:     000c0000 "Firmware"
mtd1: 00200000     "Kernel"
mtd2: 00540000    "Root-FS"
I have set up the configuration of U-Boot in order to minimize te effort booting from some other medium.
setenv bootargs console=ttyAM0 root=/dev/mtdblock2 rootfstype=jffs2 video=ep93xxfb

setenv bootcmd_nor 'setenv bootargs ${bootargs} ${mtdparts} ; bootm 60080000'

setenv bootcmd run bootcmd_nor

setenv mtdparts mtdparts=physmap-flash.0:768k@0(Firmware),

2048k@0xc0000(Kernel),-@0x2c0000(Root-FS)
It works… what can I do now?
Make the filesystem functional: Add useful things to the filesystem – a good candidate might be busybox httpd. Another useful target in OE is meta-toolchain which creates a cross compilation SDK for your device.
Now that you have read the whole text: If you do not want to build yourself you can take a look at my build results.
Enjoy!
FOSDEM 2010 February 9, 2010
Posted by Florian in Devices, Linux, OpenEmbedded, Source, World.add a comment
Something was wrong with FOSDEM this year: The weather – it was (comparably) warm and the sun was shining all the time! Apart from this it was a great event like always. I attended it representing the OpenEmbedded project with a small booth. From the OE project perspective FOSDEM was a great success. Apart from meeting people working on other projects that do use or could use OE we had a lot of interest from various other visitors at the booth.

Visitors at the OE booth
Some things I noticed during my time at the booth is that we have to improve the presentation of the project a little bit. For many visitors even on a developer event like FOSDEM OpenEmbedded is a quite uncommon project and hard to present. We showed a set of different devices at FOSDEM but we always need to explain that these devices are just samples for possible OE target devices. It’s not really obvious how to communicate this… One improvement could be to add sheets with OE information to the devices we show. We should list things like this:
- Name
- CPU Architecture
- Useful OE targets
Another thing I miss is a kind of poster or info sheet that summarizes OE achievements in some lists and numbers. But anyway I think we are getting better and become more and more popular.

Device collection
We have to thank all the project members who helped with our booth – most notably Alessandro, Robert, Marcin and Henning for spending a lot of time at the booth. Special thanks should go to Ulf (from Atmel) and Vladimir (from Archos) who made it possible to have some more interesting devices to show. I think this is the first time we didn’t have a single Zaurus at the booth… :-)
One more project / booth I think is worth to mention is Rep Rap / Makerbot. The bots for turning 3D models into real things you can touch and use gained quite some attraction.

Bots at the booth

Bot detail
Did you notice? You can even use these bots make parts for another one… I think it is worth following these projects. They might become quite important to us in near future.

A working Makerbot - just finished a job
I would have some more things to write about – there were a lot of interesting things going on at FOSDEM but like always time is lacking. More as soon as I manage to write some more lines…
Anjuta Plugin for OpenEmbedded SDK June 18, 2009
Posted by Florian in Devices, kernel concepts, Linux, OpenEmbedded, Source.Tags: Anjuta, cross compiling, debugging, devlopment, OpenEmbedded, SDK
4 comments
I have always liked the idea to have an Anjuta plugin that simplifies the use of cross toolchains in order to develop for all sorts of mobile and embedded devices. Personally I do not rely on an IDE but I have worked with a lot of developers in the past who are not used to do application development with vi. The same applies to cross toolchains, but there are reasons why people compile natively or why tools like Scratchbox are developed.
Some time ago OpenedHand published an Anjuta plugin for Poky that almost fits these needs – apart from minor lacks and the fact that you can’t use it with an OpenEmbedded build tree because it relies on the Poky directory layout. It didn’t take me long to modify the Poky plugin to fit the needs for OpenEmbedded: I have added automatic detection of the toolchain host prefix and some functionality to deal with the (not 100% fixed) directory layout of OpenEmbedded. So what does it do?
- Select a toolchain or OpenEmbedded build directory to use
- Configure and build a project
- Deploying of binaries to a target device using rsync and ssh
- Some debug and remote device features from the original plugin I didn’t test so far

Anjuta OpenEmbedded SDK Plugin
It is easy to install (and build if necessary). I have created an initial website for it at KC Labs. You can find both source archive and binary packages for Ubuntu (9.04) and Debian Lenny. Once you have it installed it you should be able to design your GUI, fill it with functionality and deploy the application to a target device withouth leaving Anjuta.
Feedback is very welcome – if you have ideas about new features or what you would like to see for cross development please let me know!
Have a nice time…
PS: LinuxTag is approaching – visit the Embeded Area with projects like OpenEmbedded and Coreboot!
LinuxTag, GSoC and some progress… June 3, 2009
Posted by Florian in Devices, GPE, kernel concepts, Linux, Maemo, OpenEmbedded.Tags: FriendlyARM, GPE, Linux, LinuxTag, Maemo, OpenEmbedded, TMPA910, Topas910, Ultimate++
2 comments
Its time to make announcements… I should have done this earlier, but like always it takes me a while to find a free minute to write things down.
First is about OpenEmbedded: We will be present at LinuxTag from 24th to 27th of June in Berlin/Germany. I just hope they have a little bit more space for us at the Embedded Area compared to last year. We usually have a lot of interesting devices running OE built Linux we can show. I’m really looking forward to LinuxTag – I haven’t missed one for many years and its always a nice event with a good mixture of community members, business people and users.

LinuxTag
Google Summer of Code is in progress for some weeks now and I’m in the great position to mentor a very interesting Maemo project… something I always wanted to see but noone found time to do it properly so far: Integrate the Maemo software framework into OpenEmbedded. The benefits are quite obvious – Maemo software will gain compatibility and quality by running on (and if necessary adapting to) various devices. Apart from the fact that Maemo is a pretty good open source framework attracting quite a lot of developers. This is something other devices can and should gain advantage from. Well rkirti made a pretty good description of the project which can be found here.
It would be pretty cool to see Maemo running on this nice device I received a few days ago…

Micro2440 running gpe-mini-browser2
Its a FriendlyARM Micro2440 from Watterott Electronic – this one is equipped with the 7 inch display which gives some more “freedom” to the applications :-) Apart from this the hardware is the same I described in my previous post.
The screen geometry would match the one used by all Maemo devices so far, so it would not mess up all the graphical user interfaces. But there is still some work to do till the boards become a really good development platform. We can build useful filesystem images for them but the installation is still split up into too many steps and the up to date kernels still lack proper support for the camera and the wifi module.
I have made a toolchain to build software for both these devices and the Topas910. Together with an updated install instruction it can be found here at labs.kernelconcepts.de. Now I’m investigating ways to integrate the toolchains with IDEs in order to simplify application development for mobile and embedded devices.

Micro2440 with Ultimate++ demo application
Here the device runs one of the Ultimate++ demo applications built with its IDE and the GPE-flavour cross toolchain built with OpenEmbedded. A friendly colleague found out what needs to be done to use it for ARM targets… it still needs a little help since Ultimate++ doesn’t seem to have an idea about pkgconfig and I’m not really happy with the size of the resulting binaries. But more about IDEs later…
Have a good time… and see you in Berlin!
A friendly Development Board May 26, 2009
Posted by Florian in Devices, GPE, kernel concepts, Linux, OpenEmbedded.Tags: FriendlyARM, GPE, Linux, Micro2440, Mini2440, OpenEmbedded
7 comments
While we are at the topic ‘evaluation and development hardware’… here here a few lines about a similar piece of hardware. I promised to do something with a FriendlyARM board already – so I did. I choosed the Micro2440 because the board itself is very small and can be used for own design easily. The very similar Mini2440 has a lot of ports on board in contrast to the 2mm headers of the Micro2440. Both boards are available through local distributors in Europe and the US now so that its not necessary to place orders in China any more. Watterott Electronic was so kind to send me a Micro2440 board and the SDK baseboard for evaluation.

If you want to get started with embedded Linux the board might be exactly what you want: A 400MHz ARM9 based Samsung S3C2440A CPU which is pretty well supported by Linux. 64MB od RAM and the same amount of NAND flash and 2MB of NOR flash for a backup bootloader. The baseboard has the connectors for the serial ports, USB host and client, display, expansion and SD and adds an audio codec and an Ethernet chip. There are two variants available: One with a 3.5″ QVGA TFT (pictured) and one with a 7″ 800×480 TFT. Both displays come with a touchscreen and in addition to this the board has a few buttons that can be used for a human interface. The whole SDK kit including Micro2440, SDK board, 3.5″ display cables and JTAG doesn’t cost more than 125 EUR incl. VAT which makes it even more appealing.
The ‘softer’ part of the SDK quite appealing too: The hardware is pretty well documented, even the schematics are available to the public. FriendlyARM released some demo images and Linux sources that are useful (but not perfect). The ‘Vivi’ bootloader used by the boards can be replaced with u-boot easily so that you get a 100% Open Source embedded development environment.
Thanks to the OpenMoko community the S3C is pretty well supported in Linux and u-boot. There is a public project providing up to date Linux, u-boot and QEmu supoort for these boards that can be found here. Like I usually do for a new piece of embedded or mobile hardware I used OpenEmbedded to built a GPE based filesystem image for it. Like you can see in the picture it works pretty well. For people interested in this I put together some notes I took and the binary images at KC Labs. Feel free to contact me about this… I plan to extend support for it a little bit and provide a toolchain and additional information.
Have a nice time!
PS: Sorry for the bad image this time, I had to use the webcam to capture it.
Linux Support for a Gem April 22, 2009
Posted by Florian in Devices, GPE, kernel concepts, Linux, OpenEmbedded.Tags: GPE, Linux, OpenEmbedded, TMPA910, Topas910
2 comments
Some time ago I got a nice looking and interesting TOPAS910 evaluation board for the ARM based Toshiba TMPA910 series of SoCs. With its black PCB and golden labels for the expansion ports it is definitely the best looking evaluation board I have seen so far. But its interesting from a technical point of view as well and of course you can run Linux on it.

Topas 910 Board
The TMPA910CRAXBG SoC on the board is based of an ARM9 core clocked with 200MHz and a pile of external interfaces such as:
- TFT controller
- USB client
- NAND and NOR flash
- SPI
- Touchscreen
- ADC
- SD / MMC
- UART
The board can be powered from the USB port, has Ethernet, a QVGA TFT display and all necessary interfaces to get started with the SoC. Some details can be found here.

Expansion Connectors
The initial Linux port was made by a company called BPlan known for their Amiga projects. They provide two ports: A real port to the hardware platform and one making use of some proprietary OpenFirmware-like bootloader. The latter is quite useless because it depends on calling its firmware for every hardware access but the 2.6.26 patch, bootloader and documentation they provide on their website are a good start. After a deeper look into the kernel patch it was clear that they left a lot of things to do: Only half of the TFT, NOR flash, USB, Ethernet anf the serial port are supported. It among other lacks a driver for SD, NAND, audio, the joypad and all the GPIO ports.
I wasn’t able to resist and started a small project to improve support for it. I have updated the kernel to 2.6.29, added gpiolib support and drivers for joypad and the small LED display which helped testing the GPIO drivers. Of course I have OpenEmbedded support for it ready and pushed upstream today – even if this still uses the old kernel it is useful to build a tiny userland that is able to live in NOR flash. Now I need to get some storage facility sich as SD or NAND flash working in order to deploy a proper filesystem image.

The TMPA910 is the BGA case in the center of the image
I would be interested in getting to know any hardware that is using this TMPA910. The results of my work: Sources and a small demo image can be found at KC Labs. We haven’t announced it yet, but its there already: KC Labs is the new Open Source projects website at kernel concepts.
Enjoy!
